Kamis, 30 November 2006

Lampu Motor Wajib Dinyalakan di Siang Hari


Mulai Rabu, Lampu Motor Wajib Dinyalakan di Siang Hari
sumber :suara pembarahuan


[JAKARTA] Direktorat Lalu Lintas Polda Metro Jaya mewajibkan
pengendara sepeda motor di wilayah Ibukota dan sekitarnya untuk menyalakan lampu sepeda motor di siang hari. Peraturan baru tersebut mulai diberlakukan Rabu (29/11).

Penggunaan lampu tersebut guna kelancaran selama perjalanan terutama saat melaju berpapasan dengan kendaraan lain atau upaya memperjelas adanya kendaraan lain dari belakang bila dilihat dari kaca spion.

"Penggunaan lampu penerangan bagi pengendara sepeda motor atau kendaraan roda dua tersebut akan terus kami sosialisasikan untuk kepentingan bersama dalam rangka kelancaran sekaligus disiplin berlalu lintas," kata Direktur Lalu Lintas (Dirlantas) Polda Metro Jaya Komisaris Besar Polisi Joko Susilo kepada wartawan, di Mapolda Metro Jaya, Selasa (28/11).

Dia mengemukakan, kampanye disiplin lalu lintas, di antaranya melalui Operasi Zebra terus dilakukan dengan sasaran mengingatkan pemakai jalan agar tetap mematuhi peraturan

Pemakai lampu penerangan hanya berlaku untuk pengendara sepeda motor  dan berlaku di ruas jalan di Jakarta dan sekitarnya. Artinya, pemakaian lampu tersebut sudah bisa dimulai atau diaktifkan sejak kendaraan keluar rumah atau melintas di keramaian lalu lintas.

Kini, sepeda motor di Jakarta mencapai 4.307.218 unit dan bila ditambah dengan mobil mencapai 6.836.567 unit. Sedangkankan ruas jalan di Jakarta 4.315 kilometer. Pertumbuhan sepeda motor per tahun diperkirakan sebesar 3.000 unit.

Sementara Kepala Bidang Humas Polda Metro Komi- saris Besar Polisi Ketut Untung Yoga mengatakan, sosialisasi penggunaan lampu bagi pengendara sepeda motor di Ibukota dan sekitarnya mulai dilakukan aktif Rabu ini, dan imbauan menggunakan syarat penerangan itu berlaku khusus pengendara sepeda motor.

"Jika di lapangan ditemukan ada pengendara sepeda motor yang tidak menyalakan lampu maka minimal mereka (pemakai motor, Red) akan ditegur oleh petugas setempat. Sampai saat ini jajaran Polda Metro terus sosialisasikan penggunaan lampu tersebut untuk kepentingan ber-sama, " kata Ketut kepada Pembaruan, Rabu (29/11).

Data Mabes Polri menyebutkan, penggunaan lampu khusus untuk sepeda motor pada siang hari telah dilakukan oleh pengendara roda dua di wilayah Jawa Timur.

Mengenai pemberlakuan jalur khusus sepeda motor di Wilayah Ibukota, Ditlantas Polda Metro terus berkoordinasi dengan Pemprov DKI atau instansi terkait menangani masalah tersebut.

Guna keamanan dan kelancaran pengendara sepeda motor saat melintas jalur khusus itu, diusulkan pula tanda pembatas dalam jarak tertentu disamping tetap diawasi oleh polisi lalu lintas. [G-5]


Jumat, 24 November 2006

B2W - JAMUAN DI BINA GRAHA - 24 Nopember 2006

Sahabat B2Wers & MTBers,


InsyaAllah besok setelah kita menemani om Andi Malarangeng ber B2W dari
rumahnya sampai ke Bina Graha, kira2 jam 8 lewat rombongan B2W akan dijamu
makan pagi di Bina Graha oleh om Andi Malarangeng.
Jadi kami mohon kesediaan sahabat semua untuk bisa ikut partisipasi B2W
bareng om Andi Malarangeng & sarapan bersama di Bina Graha.

Route B2W :
Start dari rumah om Andi di jl. Suralaya , Cilangkap, jam 6.00
Setu Cilangkap - Jl. Cipayung Raya - Binamarga Raya - Ceger Raya - TMII -
Pondok Gede Raya (Nyebrang Tol Jagorawi) - Bogor Raya (Jl Bogor lama) -
Kramat Jati - Dewi Sarika - MT.Haryono - Pancoran - Gt.Subroto - Kuningan -
Menteng - HOS.Cokroaminoto - Kebon Sirih Timur - Kebon Sirih - Merdeka Timur
(Gambir) - MerdekaUtara - Veteran 1 - Bina Graha (finish).
Total jarak tempuh : + 40 km

Meeting Points :
1. Carrefour MT.Haryono
2. MBAU (Pancoran)
3. Per4an Kuningan
4. Menteng (depan dunkin Donuts)
5. Bina Graha - jl. Veteran 3

Demikian kami sampaikan , besar harapan kami sahabat semua berkenan untuk ikut berpartisipasi dlm acara ini.
Terima kasih.

Salam Berjuta Sepeda !

Toto Sugito

note : acara ini akan diliput oleh media cetak & tv 

Selasa, 21 November 2006

Reparasi LAT...

Membayangkan mereparasi LAT, wow… nampaknya susah yak…

Itulah kesan pertama ketika ingin mencoba mereparasi LAT,
tapi jika sudah tahu trik nya, ternyata mudah kok…


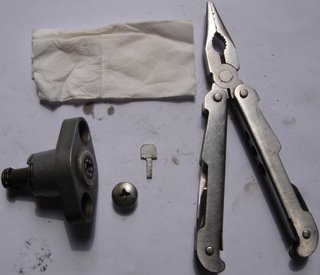
Pertama-tama kita siapkan dulu alat-alatnya:
-Kunci Ring/ kunci Sok 10mm,
-Lunci L (Hexagonal) no. 5,
-Obeng Plus/ Philips/ Kembang (yang mata nya besar dan pendek),
-Tang Lancip,
-Kunci LAT (cara membuatnya akan dijelaskan…),
-Kain lap atau tissue.
-Plus lem Sealer Mesin/ gasket LAt baru.


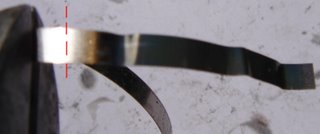
Kunci stopper/ penahan LAT dapat dibuat dari pelat setebal 1 - 1,5 mm, bisa besi atau alumunium, yang penting kaku dan tidak mudah bengkok.
Berikut ukurannya


Langkah pertama yang harus dilakukan adalah mencopot LAT dari mesin,

Caranya lepaskan dulu dynamo starter dari mesin dngan membuka 2 buah baut dengan kunci ring 10mm.
Lalu, buka baut tutup lubang LAT dengan obeng kembang,
Buka juga baut pengikat LAT di mesin dengan kunci L no.5,
Ketuk2 perlahan Body LAT dengan kepala plastic obeng atau dialai dengan kayu agar LAT bisa terlepas dari mesin dan tidak rusak…


Setelah LAT terlepas dari mesin, inilah saat yang paling mendebarkan dimulai…

1. Buka ring penahan tonjokan LAT dengan tang lancip.


2. Setelah terlepas, keluarkan semua isi dalam LAT di sebuah wadah/ tempat yang aman (misalnya ember plastik).


3. Bersihkan semua komponen LAT dengan cairan pembersih/ bensin dan keringkan, jika per LAT susah dikeluarkan, tarik dengan tang lancip. Hati2, ada ring kecil di dalam LAT, jangan sampai hilang (dimana ring kecilnya? nanti lihat pada bagian gambar perakitan LAT).


4. Setelah semua komponennya bersih, kita beralih ke “Per/ pegas LAT”, cek bagian ujung pegas, biasanya pada LAT yang rusak, ada bagian yang fisiknya seperti terbakar/ hangus. Potonglah bagian ini (yang hangus berwarna biru kehitaman saja) dengan tang.


Note: Bagian per yang hangus inilah biang keladi LAT tidak bekerja baik, karena jika ditekuk ke kanan dan ke kiri, bagian ini tidak akan balik lagi ke posisi semula, sehingga baut LAT tidak bisa memutar dan mendorong kepala LAT ke luar.


5. Per LAT yang hangus sudah beres dipotong, sekarang kita masuk ke tahap perakitan LAT.

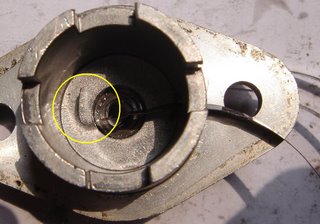
6. Masukkan ring kecil ke dalam body LAT tepat di tempat/ celah kepala baut pendorong LAT.


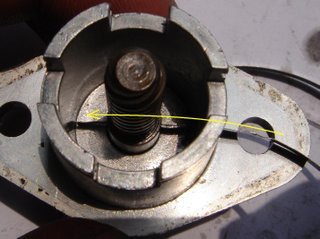
7. Masukkan baut pendorong kepala tonjokan LAT seperti pada gambar.


8. Masukkan per LAT dari samping/ lubang pengait per LAT.

Note: sebelumnya, bengkokkan ujung per LAT  yangberada di luar LAT seperti pada gambar (gbr tampak belakang LAT)


9. Masukkan ring penahan per LAT.


10. Masukkan selongsong pengganjal ring penahan per LAT.


11. Tahan selongsong dengan kedua jari tangan, gunakan jari telunjuk dan jari tengah.


12. Masukkan kunci LAT dan putar ke kanan/ searah jarum jam sampai per LAT masuk seluruhnya kedalam.


Note: Putar sampai kunci LAT benar-benar berhenti, atau sudah tidak bisa diputar lagi dan ujung per yang ditekuk sudah menempel di body LAT.
Tandanya, apabila sudah berhenti tetapi kita paksa dengan sedikit tenaga memutar lagi kunci LAT, per LAT (yang ada diluar dan ditekuk berlawanan arah jarum jam) akan sedikit tertarik ke dalam. (tapi jangan dipaksa/ diteruskan dengan memutarnya sampai masuk yak, Cukup sampai posisi putaran ini. Itu tandanya sudah jumlah putaran baut-nya sudah passs.....)

13. Jika putaran sudah cukup, selipkan/ dorong kunci LAT di antara celah-celah penahan kunci di body LAT. (jangan lepaskan jari anda pada selongsong sampai tahap mamasang kepala tonjokan LAT)

14. Dengan perlahan, pasang tonjokan LAT ke baut LAT sampai tonjokan LAT masuk ke dalam dan penahan tonjokan LAT sudah menyentuh tonjokan dan body LAT.


15. Sesuaikan celah penahan kepala LAT dengan body LAT. (Celah tidak dapat tertukar, karena ada 2 yang besar dan 2 yang lebih kecil.


16. Pasang ring penahan tonjokan LAT dengan bantuan tang lancip.


17. Beres deh….


Sekarang uji hasil reparasi LAT anda,

Lepas kunci penahan LAT, ketika kunci dilepaskan, tonjokan LAT harus keluar dengan cepat dan sedikit menghentak…

Lalu tes cara ke 2,

Genggam LAT pada saat tidak tertahan oleh pengunci LAT (dalam keadaan tonjokan terlepas penuh tanpa kunci LAT), taruh tonjokan di bagian telapak tangan dan body LAT di bagian jari-jari tangan. Genggam dengan sekuat tenaga (sebaiknya pilih tangan yang paling kuat).

Apabila tonjokan LAT “tidak bisa” masuk kedalam body LAT, maka reparasi sudah baik…

Tapi bila tonjokan LAT “bisa” masuk kedalam hanya dengan genggaman telapak tangan, kemungkinan raparasi kurang sempurna dan harus diulang kembali, atau per LAT sudah tidak baik lagi alias perlu diganti…


Lalu kita pasang ke mesin motor,

Langkahnya kebalikan pada saat membongkar.

Bersihkan seluruh permukaan LAT dan Dudukannya di mesin dengan kain lap/ Tissue sampai benar2 bersih dari oli (harus benar2 bersih dari minyak dan oli, sebab jika tidak, maka setelah LAT dipasang oli akan mengucur deras di tempat ini yang dampaknya akan membuat mesin kekurangan oli),

Jika memungkinkan, bersihkan dengan Spray Gasket Cleaner agar membuat permukaan benar2 bersih dari kontaminasi oli. (kalau saya menggunakan Spray Cleaner ThreeBond kaleng Warna biru)

Putar baut LAT dengan kunci penahannya sampai tonjokan masuk ke dalam body LAT dan tahan dengan menyelipkan kunci penahannya di sela-sela celah penahan body LAT.

Sebaiknya ganti gasket LAT dengan yang baru,

Jika tidak ada, bisa dengan cara lain, yaitu memberi sealer pada kedua permukaan (baik pada msein, LAT dan pada gasket LAT yang lama, tentunya yang sudah bersih dari oli yak)

Saran saya gunakan sealer standar Honda yaitu ThreeBond nomor 1215 (ThreeBond 1104 juga boleh, tapi dia akan mengeras dan warnanya menjadi coklat. Lalu sealer 1104 ini akan mengakibatkan komponen yang direkatkan menjadi agak susah dibuka kembali pada pembongkaran berikutnya)


Setelah LAT di pasang di mesin, kencangkan baut L 5-nya, lalu lepaskan kunci penahan

LAT dan pasang tutup lubang LAT (beri sealer bila perlu pada tutup LAT)

Pasang kembali dynamo starter (sebelumnya bersihkan/ lap bagian rongga gear dynamo starter dan bagian sil/o-ring dynamo sampai bersih)


Tunggu sekitar 15 menit agar sealer mengering, dan silahkan coba hidupkan mesin,

Jika prosedur dilakukan dengan benar, seharusnya suara mesin halus dan tidak terdengar lagi suara rantai keteng yang berbunyi Tek.. Tek.. Tek.. Tek.. Tek..  (keras) di bagian mesin sebelah kiri..

Mohon maaf apabila tulisan ini terlalu panjang, semoga bermanfaat.
Apabila ada yang masih bingung, saya bersedia menerima pertanyaan,
Atau beri komen pada artikel ini…

Terimakasih….

Sabtu, 18 November 2006

Andi Mallarangeng pun ber B2W

Written by Armanto Joedono
Monday, 13 November 2006


Belakangan ini, saban pagi, juru bicara kepresidenan Andi Alfian Mallarangeng melatih kakinya agar lentur kembali bersepeda. Sebelum berangkat ke Istana, pria 43 tahun ini rutin mengelilingi kompleks rumahnya di daerah Cilangkap, Jakarta Timur.

Ia dan komunitas Bike to Work rencananya akan bersepeda ke Istana, Kamis ini. "Ini jawaban dari kerisauan saya mengatasi keterlambatan masuk kantor karena kemacetan," katanya.

Rupanya, Andi kerap malu setelah beberapa kali terlambat datang ke rapat di Istana. Biasanya, kalau jalanan Jakarta sedang ramah, mobilnya melaju ke Istana hanya sejam. "Akhir-akhir ini sampai dua jam," ia mengeluh. Dengan bersepeda, ia memperkirakan hanya memakan waktu sejam perjalanan.

Bersepeda sebenarnya bukan kebiasaan baru baginya. Ketika kuliah di Yogyakarta dan mengajar di Makassar, Andi kerap bersepeda. Satu-satunya yang memberatkan, katanya, "Sampai ke kantor harus mandi dulu."

Nah, untuk rencana bersepeda ke Istana seminggu sekali itu, anggota Bike to Work pun ramai-ramai memperbaiki sepedanya yang pernah ia pakai saat kuliah di Amerika. "Kami akan berangkat bareng, tapi saya nggak mau dikawal," ucapnya. (Disadur dari Pokok & Tokoh Majalah Tempo, edisi 13 - 19 November 2006) (aj).

Foto: (TEMPO/RAMDANI)

sumber: http://www.b2w-indonesia.or.id

Minggu, 12 November 2006

About Disk Brake...

from http://en.wikipedia.org


Disc brake
From Wikipedia, the free encyclopedia

The disc brake is a device for slowing or stopping the rotation of a wheel. A brake disc (or rotor in U.S. English), usually made of cast iron or ceramic, is connected to the wheel or the axle. To stop the wheel, friction material in the form of brake pads (mounted in a device called a brake caliper) is forced mechanically, hydraulically, pneumatically or electromagnetically against both sides of the disc. Friction causes the disc and attached wheel to slow or stop.


History

Experiments with disc-style brakes began in England in the 1890s; the first ever automobile disc brakes were patented by Frederick William Lanchester in his Birmingham factory in 1902, though it took another half century for his innovation to be widely adopted.

Modern-style disc brakes first appeared on the low-volume Crosley Hotshot in 1949, although they had to be discontinued in 1950 due to design problems[1]. Chrysler's Imperial division also offered a type of disc brake from 1949 through 1953, though in this instance they were enclosed with dual internal-expanding, full-circle pressure plates. Reliable modern disc brakes were developed in the UK by Dunlop and first appeared in 1953 on the Jaguar C-Type racing car. The Citroën DS of 1955, with powered inboard front disc brakes, and the 1956 Triumph TR3 were the first European production cars to feature modern disc brakes[2]. The next American production cars to be fitted with disc brakes were the 1963 Studebaker Avanti[3] and the 1966 Chevrolet Corvette.

These brakes offered greater stopping performance than comparable drum brakes, including resistance to "brake fade" caused by the overheating of brake components, and recovered quickly from immersion (wet brakes are less effective). Unlike a drum brake, the disc brake has no self-servo effect and the braking force is always proportional the pressure placed on the braking pedal or lever.

Many early implementations for automobiles located the brakes on the inboard side of the driveshaft, near the differential, but most brakes today are located inside the wheels.(An inboard location reduces the unsprung weight and eliminates a source of heat transfer to the tires, important in Formula One racing.)

Disc brakes were most popular on sports cars when they were first introduced, since these vehicles are more demanding about brake performance. Discs have now become the more common form in most passenger vehicles, although many use drum brakes on the rear wheels to keep costs and weight down as well as to simplify the provisions for a parking brake. As the front brakes perform most of the braking effort, this can be a reasonable compromise.


Discs

The design of the disc varies somewhat. Some are simply solid cast iron, but others are hollowed out with fins joining together the disc's two contact surfaces (usually included as part of a casting process). This "ventilated" disc design helps to dissipate the generated heat and is commonly used on the more-heavily-loaded front rotors.

Many higher performance brakes have holes drilled or cast through them. This is known as cross drilling and was originally done in the 1960's on racing cars. Brake pads will outgas and under use may create boundary layer of gas between the pad and the rotor hurting braking performance. Cross drilling was created to provide the gas someplace to escape. Although modern brake pads seldom suffer from outgassing problems, water residue may build up after a vehicle passes through a puddle and impede braking performance. For this reason, and for heat dissipation purposes, Cross Drilling is still used on some braking components. Rotors may also be slotted, where shallow channels are machined into the disc to aid in removing dust and gas. Some discs are both drilled and slotted.

Slotted discs are generally not used on standard vehicles because they quickly wear down brake pads, however, this removal of material is beneficial to race vehicles since it keeps the pads soft and avoids vitrification of their surfaces.

On the road, drilled or slotted discs still have a positive effect in wet conditions because the holes or slots prevent a film of water building up between the disc and the pads. Poorly-made cross drilled discs (such as those made by simply drilling through a plain faced disc) may crack at the holes under use due to metal fatigue.

New technology now allows smaller brake systems to be fitted to bicycles, mopeds and now even mountain boards. The market for mountain bike disc brakes is very large and has huge variety, ranging from simple, mechanical (cable) systems, to highly expensive and also powerful, 6-pot hydraulic disc systems, commonly used on downhill racing bikes.

Disc brake rotors are commonly manufactured out of a material called grey iron. The SAE maintains a specification for the manufacture of grey iron for various applications. For normal car and light truck applications, the SAE specification is J431 G3000 (superseded to G10). This specification dictates the correct range of hardness, chemical composition, tensile strength, and other properties that are necessary for the intended use.

Historically disc brake rotors were manufactured throughout the world with a strong concentration in Europe, and America. During the period from 1989 to 2005, manufacturing of brake rotors has migrated predominantly to China. Today, almost 90% of brake discs and brake drums are manufactured in China and exported globally.

Leading manufacturers in China include Laizhou Sanli, MAT (Midwest Air Technology), Winhere, Longji, and Haimeng.


Racing

In racing and very high performance road cars other disc materials have been employed. Carbon discs and pads inspired by aircraft braking systems were introduced in Formula One by the Brabham team in conjunction with Dunlop in 1976.[4] Carbon-Carbon braking is now used in most top-level motorsport worldwide, reducing unsprung weight and giving better frictional performance compared to cast iron. Carbon brakes have occasionally been applied to road cars, by the French Venturi sportscar manufacturer in the mid 1990s for example, but need to reach a very high operating temperature before becoming truly effective and so are not well suited to road use. Ceramic discs are used occasionally at the very highest end of the road car market. A similar rationale to carbon is claimed for their use, although prestige probably also plays a large part.


Disc damage modes

Discs are usually damaged in one of three ways: warping, scarring, and cracking. Machining the discs to correct these problems also leads to reduced life. It is usually cheaper just to replace the disc instead of repairing the parts.


Warping

Warping is primarily caused by excessive heat, which softens the metal and allows it to be reshaped. The main causes of overheating are: undersized/overmachined brake discs, excessive braking (racing, descending hills/mountains), "riding" the brakes, or a "stuck" brake pad (pad touches disc at all times).

Another cause of warping is when the disc is overheated and the vehicle is stopped. When keeping the brakes applied, the area where the pads contact the disc will cause uneven cooling and lead to warping.

Several methods can be used to avoid overheating brake discs. Use of a lower gear when descending steep grades to obtain engine braking will reduce the brake loading. Also, operating the brakes intermittently - braking to slower speed for a brief time then coasting will allow the brake material to cool between applications. Riding the brakes lightly will generate a great amount of heat with little braking effect and should be avoided. High temperature conditions as found in automobile racing can be dealt with by proper pad selection, but at the tradeoff of everyday driveability. Pads that can take high heat usually do best when hot and will have reduced braking force when cold. Also, high heat pads typically have more aggressive compounds and will wear discs down more quickly.

Warping can also be caused by improperly torquing the lug nuts when putting on a wheel. The manual will indicate the proper pattern for tightening as well as a torque rating for the bolts. The tightening pattern varies little between manufacturers and most mechanics are familiar with them. Lug nuts should never be tightened in a circle. Some vehicles are sensitive to the force the bolts apply and tightening should be done with a torque wrench.

Warping will often lead to a thickness variation of the disc. If it has runout, a thin spot will develop by the repetitive contact of the pad against the high spot as the disc turns. When the thin section of the disc passes under the pads, the pads move together and the brake pedal will drop slightly. When the thicker section of the disc passes between the pads, the pads will move apart and the brake pedal will raise slightly, this is pedal pulsation. The thickness variation can be felt by the driver when it is approximately 0.007 inch (0.017 cm) or greater.

Not all pedal pulsation is due to warped discs. Brake pad material operating outside of its designed temperature range can leave a thicker than normal deposit in one area of the disc surface, creating a "sticky" spot that will grab with every revolution of the disc. Grease or other foreign materials can create a slippery spot on the disc, also creating pulsation.


Cracking

Cracking is limited mostly to drilled discs, which get small cracks around outside edges of the drilled holes near the edge of the disc due to the rotor's uneven rate of expansion in severe duty environments. Manufacturers that use drilled rotors as OEM are doing so for two reasons: looks, if they determine that the average owner of the vehicle model will not overly stress them; or as a function of reducing the unsprung weight of the brake assembly, with the engineering assumed that enough brake rotor mass remains to absorb racing temperatures and stresses. A brake disc is a heat sink, so removing mass increases the heat stress it will have to contend with. Generally an OEM application that is not drilled will crack and could fail catastrophically if used over and above the original equipment design. Once cracked, these discs cannot be repaired.


Calipers

The brake caliper is the assembly which houses the brake pads and pistons. The pistons are usually made of aluminum or chrome-plated iron. There are two types of calipers: floating or fixed. A fixed caliper does not move relative to the disc. It uses one or more pairs of pistons to clamp from each side of the disc, and is more complex and expensive than a floating caliper. A floating caliper (also called a "sliding caliper") moves with respect to the disc; a piston on one side of the disc pushes the inner brake pad until it makes contact with the braking surface, then pulls the caliper body with the outer brake pad so pressure is applied to both sides of the disc.

Floating caliper (single piston) designs are subject to failure due to sticking which can occur due to dirt or corrosion if the vehicle is not operated regularly. This can cause the pad attached to the caliper to rub on the disc when the brake is released. This can reduce fuel effiency and cause excessive wear on the affected pad.


Pistons and cylinders

The most common caliper design uses a single hydraulically actuated piston within a cylinder, although high performance brakes use as many as twelve. (Some pre-1969 Chrysler and General Motors vehicles had four-piston calipers - usually sought after by restorers.) Modern cars use different hydraulic circuits to actuate the brakes on each set of wheels as a safety measure. The hydraulic design also helps multiply braking force. The number of pistons in a caliper is often referred to as the number of 'pots', so if someone has six pot calipers they mean each caliper has six pistons in them.

Failure can occur due to failure of the piston to retract - this is usually a consequence of not operating the vehicle during a time that it is stored outdoors in adverse conditions. For high distance vehicles the piston seals may leak, which must be promptly corrected.


Brake pads

The brake pads are designed for high friction with brake pad material embedded in the disc in the process of bedding while wearing evenly. Although it is commonly thought that the pad material contacts the metal of the disc to stop the car, the pads work with a very thin layer of their own material and generate a semi-liquid friction boundary that creates the actual braking force. Of course, depending on the properties of the material, disc wear could be faster or slower than with other pads. The properties that determine material wear involve trade-offs between performance and longevity. The brake pads must be replaced regularly, and most are equipped with a method of alerting the driver when this needs to take place. Some have a thin piece of soft metal that causes the brakes to squeal when the pads are too thin, while others have a soft metal tab embedded in the pad material that closes an electric circuit and lights a warning light when the brake pad gets thin. More expensive cars may use an electronic sensor. Although almost all road-going vehicles have only two brake pads per caliper, racing calipers utilise up to six pads, with varying frictional properties in a staggered pattern for optimum performance.

Early brake pads (and shoes) contained asbestos. When working on an older car's brakes, care must be taken not to inhale any dust present on the caliper (or drum).


Brake squeal

Sometimes a loud noise or high pitch squeal occurs when the brakes are applied. Most brake squeal is produced due to vibration (resonance instability) of the brake components especially the pads and rotors. This type of squeal does not negatively affect brake stopping performance. Some simple techniques like adding chamfers to linings, greasing or gluing the contact between caliper and the pads (finger to backplate, piston to backplate), bonding insulators (damping material) to pad backplate, etc might help reduce squeal. Many times cold weather combined with high early morning humidity (dew) could make the brake squeal worse and vanishes when the lining reaches regular operating temperatures. However, some lining wear indicators are also designed to squeal when the lining is due for replacement. Overall brake squeal can be annoying to the vehicle passengers, passerby, pedestrians, etc especially as vehicles are designed to be more comfortable and quieter. Hence vehicle NVH (Noise, Vibration and Harshness) is one of the important priorities for today's vehicle manufacturers.

An age-old trick is to put a small amount of copper slip (copper grease) onto the back of the pads where they contact the brake caliper piston. While this will normally stop the squeal, getting grease on the pads or disks will affect braking performance.

Dust on the brakes may also cause squeal, and there are many commercial brake cleaning products that can be used to remove dust and contaminants from the brakes.

sumber http://en.wikipedia.org/wiki/Disc_brake

Sekilas Mengenai Rem Tromol

dapet dari http://en.wikipedia.org/


Drum brake
From Wikipedia, the free encyclopedia
Jump to: navigation, search

A drum brake is a brake in which the friction is caused by a set of shoes or pads that press against the inner surface of a rotating drum. The drum is connected to a rotating wheel


History

The modern automobile drum brake was invented in 1902 by Louis Renault, though a less-sophisticated drum brake had been used by Maybach a year earlier. In the first drum brakes, the shoes were mechanically operated with levers and rods or cables. From the mid-1930s the shoes were operated with oil pressure in a small wheel cylinder and pistons (as in the picture), though some vehicles continued with purely-mechanical systems for decades. Some designs have two wheel cylinders.

The shoes in drum brakes are subject to wear and the brakes needed to be adjusted regularly until the 1950s introduction of self adjusting drum brakes. In the 1960s and 1970s brake drums on the front wheels of cars were gradually replaced with disc brakes and now almost all cars use disc brakes on all wheels. However, drum brakes are still often used for handbrakes as it has proved very difficult to design a disc brake suitable for holding a car when it is not in use. Moreover, it is very easy to fit a drum handbrake inside a disc brake so that one unit serves for both footbrake and handbrake.

Early type brake shoes contained asbestos. When working on brake systems of older cars, care must be taken not to inhale any dust present in the brake assembly. The Federal government began to regulate asbestos production, and there was a period of time where owners complained of poor braking with the non-asbestos linings. Eventually technology advanced to compensate. A majority of daily-driven older vehicles have been fitted with asbestos-free linings.


Servo design

Drum brakes, depending on the way the shoes are hinged, can have a "self-servo" characteristic. This increases stopping power without any additional effort by the driver because the rotation of the drum drags the shoes around with it, increasing the force holding them together. In rear brakes (as illustrated above) only one shoe will have this characteristic. Front drum brakes may use two actuating cylinders which allow both shoes to utilize the servo characteristic and which also increase the front axle braking force, required to compensate for forward weight shift and also to avoid premature rear-wheel locking. Servo action can be used to make a very powerful brake (as on the rear axles of large commercial vehicles), but it does reduce the ability of the driver to modulate the brakes sensitively. (The disc brake has no self-servo effect because the pads act perpendicularly to the rotating disc.)


Advantages

Drum brakes are still used in modern cars. There can be engineering and cost advantages. Drum brakes allow simple incorporation of a parking brake. They are often applied to the rear wheels since most of the stopping happens in the front of the vehicle and therefore the heat generated in the rear is significantly less. Drum brakes are also occasionally fitted as the parking (and emergency) brake even when the rear wheels used disk brakes as the main brakes. In this situation, a small drum is usually fitted within or as part of the brake disk.

An advanced technology hybrid car using drum rear brakes is the Toyota Prius. (4-wheel discs are used in certain markets - Hybrid vehicles greatly reduce everyday wear on braking systems owing to their energy recovery motor-generators, see regenerative braking).


Disadvantages

Drum brakes with internal shoes have a particular disadvantage; when the drums are heated by hard braking the diameter of the drum increases due to the expansion of the material and the brakes must be further depressed to obtain effective braking action. This is known as brake fade and can lead to driver panic and brake failure in extreme circumstances. Under normal driving conditions it is seldom noticed, especially when drums of appropriate size are fitted. The Pontiac GTO is one vehicle often cited as having undersized drums.

Before 1984, it was common to re-arc brake shoes to match the arc within brake drums; the machinery used has been phased out. This practice, however, was controversial as it removed friction material from the brakes and caused a reduction in the life of the shoes as well as creating hazardous asbestos dust. It is much better to use shoes for the proper diameter drum, and if the procedure was needed, the drums were so worn that they should have been replaced, as the thickness of the drum contributes to the strength and the heat absorption and dissipation ability of the drum.


Adjustment


Early drum brakes (before about 1955) required periodic adjustment to compensate for drum and shoe wear. If not done sufficiently often the symptom would be long brake pedal travel ("low pedal"), which could also be caused by low hydraulic fluid level. Low pedal can be a severe hazard when combined with brake fade as the brakes can become ineffective when the pedal bottoms out.

Self adjusting brakes may use a mechanism that engages only when the vehicle is being stopped from reverse motion. This is a traditional method suitable for use where all wheels use drum brakes (most vehicles now use disc brakes on the front wheels). By operating only in reverse it is less likely that the brakes will be adjusted while hot (when the drums are expanded), which could cause dragging brakes that would accelerate wear and reduce mileage.

Self adjusting brakes may also operate by a ratchet mechanism engaged as the hand brakes is applied, a means suitable for use where only rear drum brakes are used. If the travel of the parking brake actuator lever exceeds a certain amount, the ratchet turns an adjuster screw that moves the brake shoes toward the drum.


text taken from http://en.wikipedia.org/wiki/Drum_brake
picture taken from http://www.howstuffworks.com/

Tambahan mengenai Minyak rem

diambil dari http://en.wikipedia.org

Brake fluid
From Wikipedia, the free encyclopedia
Jump to: navigation, search

Brake fluid is a type of hydraulic fluid used in brake applications in motorcycles, automobiles, light trucks and some advanced bicycles. It is used to transfer force under pressure from where it is created through hydraulic lines to the braking mechanism near the wheels. It works because liquids are not appreciably compressible. Braking applications produce a lot of heat so brake fluid must have a high boiling point to remain effective and must also not freeze under normal temperatures. These requirements eliminate most water-based solutions.

Brake fluid comes in a number of forms, standardized under by the United States Department of Transportation (DOT). DOT 2 is essentially castor oil; DOT 3, DOT 4, and DOT 5.1 are composed of various mineral oils, glycol esters and ethers; and DOT 5 is silicone-based. As of 2006, most cars produced in the U.S. use DOT 3.

Glycol based fluids are two times less compressible than silicone type fluids, even when heated. Less compressibility of brake fluid will increase pedal feel (firmness), but in either case this effect is minimal. The U.S. Army has used silicone brake fluid exclusively since 1982 successfully. Glycols are hygroscopic and will absorb water from the atmosphere, reducing the boiling point of the fluid and degrading hydraulic efficiency. Changing fluid on a regular basis will greatly increase the performance of the brake system, but this is often not a concern in passenger cars. On the other hand, changing fluid at least every several years will preserve the life of brake system components (by removing accumulated water and other contaminants) and increase the overall reliability of the brake system.

Polyethylene glycol and other brake fluid ingredients may be corrosive to paint and finished surfaces such as chrome and thus care should be taken when working with the fluid. Additionally, polyethylene glycol, in the concentrations found in DOT brake fluids, reacts violently, producing a large fireball, with some household chemicals, notably pool care products.

Hotwheelscollectors.com cites that hobby modellers use brake fluid as a safe (if somewhat slow) paint stripper. It is less likely to harm skin and will not harm plastics.

sumber: http://en.wikipedia.org/wiki/Brake_fluid